Software
Mac OS X 10.6.4
MySQL 5.1.48
MySQL Connector/J 5.1.12
NetBeans 6.9
GlassFish 3.0.1
Drupal 6.17
Quercus 4.0.3
Database:
- Create the Drupal user in the database.
GRANT SELECT, INSERT, UPDATE, DELETE, CREATE, DROP, INDEX, ALTER ON drupal.* TO 'drupal'@'localhost' IDENTIFIED BY 'drupal';
Note: This is not secure and should only be used for demo.
- Create a new database in mySQL called drupal.
create database drupal character set utf8;
Download and extract the quercus-4.0.3.war file.
jar -xvf quercus-4.0.3.war WEB-INF
Drupal:
- Download and extract Drupal 6.17
- Copy the WEB-INF directory and files from the Quercus into the Drupal directory.
- Extract mySQL Connector/J
unzip mysql-connector-java-5.1.12.zip
- Copy the mysql-connector-java-5.1.12-bin.jar to the ../glassfish-3.0.1/glassfish/domains/domain1/lib/ext directory. This allows any project deployed to domain1 to connect to a mySQL server.
NetBeans
- Create a new project. Select Java Web and Web Application with Existing Sources. Click Next.
- Select the location of the files we previously extracted for the Location.
- Accept default project name.
- Change the project folder name to drupal. Click Next.
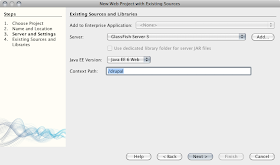
- Ensure GlassFish Server 3 is selected as the server.
- The Java EE version should be Java EE 6.
- Change the context path to /drupal. Click Next.
- Set the Web Pages Folder: to point to the top level of our sources. In our case it is drupal-6.17. Click Finish.
- Open the Web Pages -> sites -> default folder. You should see a file called default.settings.php. Copy the file and rename it to settings.php. Our application configuration is complete.
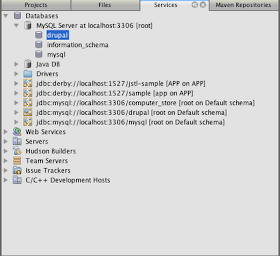
- Go to the Services tab. Expand the Databases tree. Select MySQL Server. Right click and select Create Database from the context menu.
- Create a database called drupal. Check the checkbox for Grant Full Access To:. Pick the drupal@localhost user. Press OK.
- Click on the deploy button. After the application is deployed to GlassFish, you should see Drupal Configuration screen below.
- Select Install Drupal in English
- Set up the database configuration. In my case, I chose the mysqli radio button and provided database name: drupal, database username: drupal, and database password: drupal.
Note: I had to fill in the information twice. DO NOT USE MY CONFIGURATION IN PRODUCTION.
- Fill in the site configuration parameters.
Note: Once the site is deployed. I received an SMTP error as noted below. It seems that it can be safely ignored.
- Installation Complete.
Here is an example of what my finished site looks like.
If you want to watch a 5 minute video on the whole process, please check the link below.


This is great to read and I appreciate it that you shared handy post . I will keep this post in mind.
ReplyDelete