Sunday, December 20, 2009

Nexus - "The Nexus Book" by Sonatype

I completed the Nexus book (version 1.8.2) from Sonatype last night.  A special thanks to Tim O'Brien for sending me a copy. The book is remarkably well written for the sections I reviewed. I installed the open source version of the software, and not the professional edition. As a result, a number of chapters were not applicable to my installation. I examined chapters: 1-6, 17, and Appendix C.

Note: Chapters 7-16 were excluded because it applies to professional edition. Chapter 18 is about developing plugins, and Appendices A-B apply to migrations to Nexus.

I did a cursory installation of Nexus using the binary installation and the books seems to match the installation process. My review is focused on installing the 1.4.0 war file on GlassFish 2.1.1 and 3.0. After I began my review, a new update 1.4.1 was was released and I got a chance to test the upgrade process. I can state it was a seemless upgrade.

Note: I found that I could not install the application on GlassFish version 3.0.

The book is definitely worth reading if you are serious about using Apache Maven and would like to host a repository for your development environment (team).

Chapter 6 Nexus Plugins

My only real complaint is Chapter 6. The details in the book are not correct for version 1.8.2 of the book. Section 6.2 Installing Plugins should point the user to installing the plugins in the following directory:
${NEXUS_WORK}/nexus/plugin-repository
I installed the Nexus Archetype Plugin (not detailed in book) and it was painful until I discovered the correct directory. Once it was in the correct directory it worked seamlessly. I have submitted a bug NXBOOK-394.

I would have liked more explanation of the available plugins including the open source LDAP plugin as an alternative to the version which is available in the commercial licensed professional edition.

Chapter 17 Nexus Best Practices

It was only 1.5 pages long. It needs more content to be useful.

Appendix C Configuring Nexus for SSL

This chapter is very important and covers Jetty extensively. The chapter should have included a little more assistance on setting up Apache HTTPD to handle SSL. There is also no coverage for Apache Tomcat, or GlassFish. These are all popular arrangements.

Final Thoughts...

I liked the book and thought any serious Nexus user, or potential user should read the book. It includes a lot of details, and a plethora of screen shots to get you on your way. 

Monday, December 14, 2009

OS X "Dirty Dot"

To use the OS X "Dirty Dot" to indicate that changes have been made that need to be saved you can use the code snippets below.

To set this "Dirty Dot" use the following code:
myJFrame.getRootPane().putClientProperty("windowModified", Boolean.TRUE);

Use the following line to clear the dot after a save has occurred:
myJFrame.getRootPane().putClientProperty("windowModified", Boolean.FALSE);

Java library search order OS X

Per the Apple documentation, the Java library search order is as follows:
  1. User's home directory (~/Library/Java/Extensions/)
  2. Local domain (/Library/Java/Extensions/)
  3. Network domain (/Network/Library/Java/Extensions/)
  4. System domain (/System/Library/Java/Extensions/)
  5. $JAVA_HOME/lib/ext

You'll note that the user's home directory takes precedence over the other locations; this helps a developer working on a system to easily share a machine with other users and avoid classpath difficulties.

How do I change the default __MyCompanyName__ in Xcode?

Add the following information to the com.apple.Xcode.plist file using Property List Editor:
PBXCustomTemplateMacroDefinitions - Dictionary
ORGANIZATIONNAME String MyNewCompanyName

Monday, November 23, 2009

Simple JavaServerFaces (JSF) Reference Example - Table

In the world of modern Integrated Development Environments (IDE)s, we have become accustomed to visual development, or at least code completion. We have also come to rely on advanced JSF frameworks like Woodstock, ICEFaces, myFaces, etc. A couple of weeks ago someone asked me about how to create a JSF page including a table, and how to "bind" the values to the table. That person did not have access to an advanced framework, and wanted to use a reference implementation. I created a simple NetBeans project which included only the reference implementation. I forgot how strange it is to code everything. A lot of the modern components have taken the complexity of creating the components out of your hands.

Below is an example application which uses the reference implementation only.


JSFRIDemo-1.0.zip

Saturday, November 21, 2009

Swing Event Examples - JButton and JRadioButton

I was looking at some code examples I created, and decided to polish them up and post them. One of the most challenging issues for most Swing developers is learning, and using events. I have included to examples below: One using events associated with a JButton, and the other using ActionEvents when a JRadioButton is pressed.

Note: The attached project is a NetBeans 6.5.1 project.

Here is the JButtonsEvent.java example

/*
* Copyright 2009 John Yeary <jyeary@bluelotussoftware.com>.

*
* Licensed under the Apache License, Version 2.0 (the "License");
* you may not use this file except in compliance with the License.
* You may obtain a copy of the License at
*

* http://www.apache.org/licenses/LICENSE-2.0
*
* Unless required by applicable law or agreed to in writing, software
* distributed under the License is distributed on an "AS IS" BASIS,
* WITHOUT WARRANTIES OR CONDITIONS OF ANY KIND, either express or implied.

* See the License for the specific language governing permissions and
* limitations under the License.
* under the License.
*/

/**
* JButtonEvents.java

*
* Created on Dec 30, 2008, 3:00:00 PM
*

* $Id: JButtonEvents.java 155 2009-11-21 15:06:40Z jyeary $
*/

package com.bluelotussoftware.examples.swing;

import java.awt.event.ActionEvent;
import java.awt.event.ActionListener;
import java.awt.event.ItemEvent;
import java.awt.event.ItemListener;
import javax.swing.JButton;

import javax.swing.JFrame;
import javax.swing.event.ChangeEvent;
import javax.swing.event.ChangeListener;

/**
*
* @author John Yeary <jyeary@bluelotussoftware.com>

* @version 1.0
*/
public class JButtonEvents extends javax.swing.JFrame {

JButton button;

public JButtonEvents() {
initialize();
}

private void initialize() {
button = new JButton("Press Me");

//Add Listeners as anonymous inner classes.

button.addActionListener(new ActionListener() {

public void actionPerformed(ActionEvent e) {
System.out.println("ActionEvent!");
}
});

button.addItemListener(new ItemListener() {

public void itemStateChanged(ItemEvent e) {
System.out.println("ItemEvent!");
}
});

button.addChangeListener(new ChangeListener() {

public void stateChanged(ChangeEvent e) {
System.out.println("ChangeEvent!");
}
});


// Exit the application when the frame is closed

this.setDefaultCloseOperation(JFrame.EXIT_ON_CLOSE);
this.add(button);
this.pack();
}

/**
* @param args the command line arguments

*/
public static void main(String[] args) {
java.awt.EventQueue.invokeLater(new Runnable() {

public void run() {
new JButtonEvents().setVisible(true);
}
});
}
}

Here is the JRadioButtonActionEvents.java example

/*
* Copyright 2008-2009 John Yeary <jyeary@bluelotussoftware.com>.

*
* Licensed under the Apache License, Version 2.0 (the "License");
* you may not use this file except in compliance with the License.
* You may obtain a copy of the License at
*

* http://www.apache.org/licenses/LICENSE-2.0
*
* Unless required by applicable law or agreed to in writing, software
* distributed under the License is distributed on an "AS IS" BASIS,
* WITHOUT WARRANTIES OR CONDITIONS OF ANY KIND, either express or implied.

* See the License for the specific language governing permissions and
* limitations under the License.
* under the License.
*/

/*
* JRadioButtonActionEvents.java

*
* Created on Dec 30, 2008, 3:45:09 PM
*
* $Id: JRadioButtonActionEvents.java 155 2009-11-21 15:06:40Z jyeary $
*/
package com.bluelotussoftware.examples.swing;


import java.awt.event.ActionEvent;
import java.awt.event.ActionListener;
import java.util.Enumeration;
import javax.swing.ButtonModel;
import javax.swing.JRadioButton;

/**

*
* @author John Yeary <jyeary@bluelotussoftware.com>
* @version 1.0

*/
public class JRadioButtonActionEvents extends javax.swing.JFrame {

/** Creates new form JRadioButtonActionEvents */

public JRadioButtonActionEvents() {
initComponents();

int value = 0;
ButtonModel[] models = new ButtonModel[3];
int ctr = 0;
Enumeration e = buttonGroup1.getElements();

while (e.hasMoreElements()) {
JRadioButton x = (JRadioButton) e.nextElement();
models[ctr++] = x.getModel();

}
jRadioButton1.setActionCommand("A");
jRadioButton2.setActionCommand("B");
jRadioButton3.setActionCommand("C");
ActionListener action = new MyActionListener();
jRadioButton1.addActionListener(action);
jRadioButton2.addActionListener(action);
jRadioButton3.addActionListener(action);
buttonGroup1.setSelected(models[value], true);
}

class MyActionListener implements ActionListener {

public void actionPerformed(ActionEvent e) {
String s = e.getActionCommand();

if ("A".equalsIgnoreCase(s)) {
System.out.println("Radio Button \"A\" ActionEvent!");
} else if ("B".equalsIgnoreCase(s)) {
System.out.println("Radio Button \"B\" ActionEvent!");
} else if ("C".equalsIgnoreCase(s)) {
System.out.println("Radio Button \"C\" ActionEvent!");
}
}
}

/** This method is called from within the constructor to

* initialize the form.
* WARNING: Do NOT modify this code. The content of this method is

* always regenerated by the Form Editor.
*/

@SuppressWarnings("unchecked")
// <editor-fold defaultstate="collapsed" desc="Generated Code">
private void initComponents() {

buttonGroup1 = new javax.swing.ButtonGroup();
jRadioButton1 = new javax.swing.JRadioButton();
jRadioButton2 = new javax.swing.JRadioButton();
jRadioButton3 = new javax.swing.JRadioButton();
jLabel1 = new javax.swing.JLabel();

setDefaultCloseOperation(javax.swing.WindowConstants.EXIT_ON_CLOSE);

buttonGroup1.add(jRadioButton1);
jRadioButton1.setText("A");

buttonGroup1.add(jRadioButton2);
jRadioButton2.setText("B");

buttonGroup1.add(jRadioButton3);
jRadioButton3.setText("C");

jLabel1.setText("Select a radio button to generate an ActionEvent");

org.jdesktop.layout.GroupLayout layout = new org.jdesktop.layout.GroupLayout(getContentPane());
getContentPane().setLayout(layout);
layout.setHorizontalGroup(
layout.createParallelGroup(org.jdesktop.layout.GroupLayout.LEADING)
.add(layout.createSequentialGroup()
.addContainerGap()
.add(layout.createParallelGroup(org.jdesktop.layout.GroupLayout.LEADING)
.add(jLabel1)
.add(layout.createSequentialGroup()
.add(21, 21, 21)
.add(jRadioButton1)
.addPreferredGap(org.jdesktop.layout.LayoutStyle.RELATED)
.add(jRadioButton2)
.addPreferredGap(org.jdesktop.layout.LayoutStyle.RELATED)
.add(jRadioButton3)))
.addContainerGap(org.jdesktop.layout.GroupLayout.DEFAULT_SIZE, Short.MAX_VALUE))
);
layout.setVerticalGroup(
layout.createParallelGroup(org.jdesktop.layout.GroupLayout.LEADING)
.add(org.jdesktop.layout.GroupLayout.TRAILING, layout.createSequentialGroup()
.addContainerGap()
.add(jLabel1)
.addPreferredGap(org.jdesktop.layout.LayoutStyle.UNRELATED)
.add(layout.createParallelGroup(org.jdesktop.layout.GroupLayout.BASELINE)
.add(jRadioButton1)
.add(jRadioButton2)
.add(jRadioButton3))
.addContainerGap(org.jdesktop.layout.GroupLayout.DEFAULT_SIZE, Short.MAX_VALUE))
);

pack();
}// </editor-fold>

/**
* @param args the command line arguments

*/
public static void main(String args[]) {
java.awt.EventQueue.invokeLater(new Runnable() {

public void run() {
new JRadioButtonActionEvents().setVisible(true);
}
});
}

// Variables declaration - do not modify

private javax.swing.ButtonGroup buttonGroup1;
private javax.swing.JLabel jLabel1;
private javax.swing.JRadioButton jRadioButton1;
private javax.swing.JRadioButton jRadioButton2;
private javax.swing.JRadioButton jRadioButton3;
// End of variables declaration
}

NetBeans project files SwingEventsExamples-1.0.zip

Monday, November 02, 2009

JSF 1.2: Woodstock and Facelets

I have been asked if there is an example of how to use facelets. In this example application, I have changed the default namespace in my NetBeans project to w from webuijsf to make it simpler to see. In this example I display the customers from the sample database which is part of the default installation of NetBeans.

Here is what it looks like displayed:


Here is the facelets view:

The source code can be found on BitBucket here:WoodstockFaceletsExample

Friday, September 11, 2009

Using JTabbedPane on Swing Application Framework (JSR-296)

I was trying to figure out how to set the selected tab for a multi-tab JTabbedPane on my Swing Application Framework application. I thought that a quick Google search would have a simple answer. This was not the case. I found a post on a forum where a number of other people were wondering how to do it. So here is a summary of how I did it.

On the Frameview, I added a method as show below:

public void setSelectedTab (Integer tabIndex) {
tabPanel.setSelectedIndex(tabIndex);
}


The tabPanel in my case is the JTabbedPane instance.

In the SingleFrameApplication, I modified the startup() method to display the tab I want.

Note: You must set it after a call to show() the FrameView

@Override
protected void startup() {
FrameViewImpl frameView = new FrameViewImpl(this);
show(frameView);
//This must be done after the GUI is displayed
frameView.setSelectedTab(0);
}

Thursday, September 10, 2009

Beans Binding Part Deux

I have really enjoyed using the Beans Binding Framework (JSR-295) in the past. It was a really good start to making Swing a more usable platform doing client development. The project and JSR have been left abandoned by Sun. In large measure this was the result of development work done by Sun on JavaFX.

The really painful part of JavaFX currently is based on two items:
  1. No table (grid) component.
  2. No data providers to make binding to a database easy.
The result is a nearly useless framework for business developers who don't need shiny new baubles. I need Swing to work.

I am not the only person who feels this way. Fabrizio Giudici has created a project on Kenai.com to address the shortcomings: Better Beans Binding. He took the original JSR-295 code and forked it to create the new project. The package names have remained the same to allow a drop in replacement for the current beans binding framework without breaking anything. I am excited that Fabrizio has decided to do this project. I am hopeful that others wil join the project and make "better beans binding" a reality for the business users and others who need to make Swing just work.

Tuesday, September 08, 2009

OpenSolaris 2009.06 Update

Today I performed an update of my OpenSolaris 2009.06. It went perfectly. It is fascinating that I performed the update which also included a new boot environment without a hitch.

I performed a similar update to my MacBook Pro with OS X Snow Leopard, and was a lot less successful. In the Snow Leopard update, a number of my Java applications do not work now because Apple changed the packages (not names) of the GUI components. Also, the WiFi would not work. Since the introduction of the iPhone, Apple has lost some of its edge on OS X development. Don't get me wrong, I have an iPhone and love it, but Apple seems to spend more time on its development rather than core OS. I state this in spite of the claims its focus for 10.6.

Wednesday, August 26, 2009

Redmine 0.8.4 Deployment on GlassFish 2.1 using JRuby 1.3.1

Introduction

In this tutorial I will explain how to install Redmine 0.8.4 on GlassFish 2.1 using JRuby 1.3.1 with MySQL.

Required Software

  • Redmine 0.8.4

  • GlassFish 2.1

  • NetBeans 6.7

  • MySQL 5.1

Instructions


  1. First we will need to download and install JRuby 1.3.1. The binaries can be found on the Kenai site.

  2. Make sure that your PATH is set to point to your JRuby installation. You can check your install by typing jruby -v at the command prompt. You should see something similar to the listing below.
    dev:~ jyeary$ jruby -v
    jruby 1.3.1 (ruby 1.8.6p287) (2009-06-15 2fd6c3d) (Java HotSpot(TM) 64-Bit Server VM 1.6.0_15) [x86_64-java]

  3. Run from the command line
    jruby -S gem update
    This will update all of the gems required to run our application.

  4. Run from the command line
    jruby -S gem install jruby-openssl rails mongrel jdbc-mysql activerecord-jdbcmysql-adapter warbler
    This will install all of the gems required to run our application.

  5. Download a copy of Redmine 0.8.4 and unzip it.

  6. Using NetBeans 6.7.1, check the Tools --> Ruby Platform Manager to make sure that you install the JRuby 1.3.1 platform.


  7. In NetBeans, create a new Ruby on Rails Application with Existing Sources. Next


  8. Select the unzipped RoR Redmine application as the project folder.

  9. Select the JRuby 1.3.1 Platform from the combo-box menu.

  10. Select Mongrel for the server from the combo-box menu. Click Finish. NetBeans will create the RoR project and install Warbler which will create our war file for deployment on GlassFish.


  11. We are now ready to configure the application. Follow the instructions for configuring the application here.

  12. In the redmine-0.8.4 directory run the following command
    jruby -S warble config
    This will create the configuration file for warbler to build our war file for deployment on GlassFish.

  13. Edit the warble.rb file and modify the config.dirs line to the following:
    config.dirs = %w(app config lib log vendor tmp files lang)
    This will make sure that we deploy all of the application relevant files in our war file.

  14. Edit the warble.rb file and add the following line:
    config.gems = ["activerecord-jdbcmysql-adapter"]
    This will make sure that when we convert the application to a war file that the appropriate ActiveRecord JDBC drivers for MySQL are added to it.

  15. Run the application to make sure that it runs correctly on Mongrel.

  16. Run the following commands to create the war file
    jruby -S rake war:clean
    jruby -S rake war


  17. Go to the Administrative Console on GlassFish. Select Web Applications and deploy the new redmine-0.8.4.war file.


Saturday, July 04, 2009

Woodstock Dropdown List Binding Examples

I am spending the morning answering a number of questions posted to the nbj2ee list. One of the questions was how to add separators to to drop down lists. I decided to write a little code example to show how this is done.

The idea is to retrieve the data values from a database. In this case, I use a built in travel database from NetBeans.

There are two examples. The first one is a simple database binding, and the second uses the Option class to control the output.

The Option class allows us to insert any "filler" into the items we display in the list. Here is the code.
    public Option[] getOptions() {
List<Option> options = new ArrayList<Option>();
personDataProvider.cursorFirst();
Option firstOption = new Option(personDataProvider.getValue("PERSON.PERSONID"), (String) personDataProvider.getValue("PERSON.NAME"));
options.add(firstOption);
Option filler = new Option(99999, "----------");
options.add(filler);
while (personDataProvider.cursorNext()) {
Option option = new Option(personDataProvider.getValue("PERSON.PERSONID"), (String) personDataProvider.getValue("PERSON.NAME"));
options.add(option);
}
return options.toArray(new Option[options.size()]);
}
Here is the source code DropDownListExample. The example was created using NetBeans 6.5.1 and Visual JSF plugin.

Wednesday, June 10, 2009

Suggestions for IT Professionals in a Down Economy

I just read an article from Computer World about how to remain positive in a down economy. I found the article to be spot on.

The first item was going back to your roots and doing the things that attracted you to a career in IT. I agree. If you are not doing something you love now, go back and reflect on why. Perhaps it is learning something new, or fixing something old. Get the flame back.

The second item referred to social networking. I am on Linked-In, Twitter, Facebook, Plaxo, etc. I know a number of people who have made this their personal addictions. I have not become addicted to it, but I find a lot of value. The ability to connect with friends, colleagues (current and former), peers, and associates is truly satisfying. It can help you in many ways, as long as, you are careful not to post anything that you would not be proud to show your mother.

They mention getting out into the real world. I would agree. I recommend joining your local user groups (Java Users Group), and attend free conferences like the Southeast Linux Fest. These groups are your peers, and contacts to potential jobs. Conferences can enhance your technical skills, and allow you to meet like minded individuals. It also can expose you to new technologies to make your IT life better.

The article also mentions getting technical certifications. I could not agree more. Here again, your local technical user group may be able to help by offering courses, certification boot camps, or technical deep dives. You can also enhance your knowledge by offering to give talks. You will really learn how much of a subject matter expert you are based on the questions the attendees ask.

Monday, May 04, 2009

How to Convert a File to a Byte Array

I wrote an EJB which performs faxing using gnu-hylafax for Java. The trick is that I needed to convert the file to bytes[] to pass to the EJB. Here is how I did it, but it should work for most files.


/**
* Converts a file into a byte[] array.
* @param file file to be converted
* @return file converted to {@code byte[]}
* @throws java.io.IOException
*/
public static byte[] getBytesFromFile(final File file) throws IOException {
InputStream is = new FileInputStream(file);

// Get the size of the file
long length = file.length();

if (length > Integer.MAX_VALUE) {
/* File is too large. If we are trying to determine the length of the byte[]
* array, it can only return an int, so we are limited by the file size.
*/
throw new IOException(file.getName() + " is too large.");
}

// Create the byte array to hold the data
byte[] data = new byte[(int) length];

// Read in the bytes
int offset = 0;
int bytesRead = 0;
while (offset < data.length &&
(bytesRead = is.read(data, offset, data.length - offset)) >= 0) {
offset += bytesRead;
}

// Ensure all the bytes have been read in
if (offset < data.length) {
throw new IOException("An exception occurred while trying to read + "
+ file.getName() + " into the byte array.");
}

// Close the input stream and return bytes
is.close();
return data;
}
}

Friday, May 01, 2009

Mercurial on GlassFish 2.1 Using Multiple Repositories

Introduction

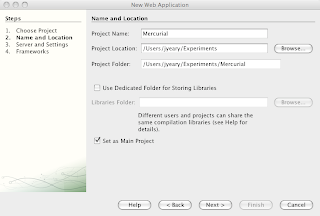
In this tutorial I explain the basics of creating multiple Mercurial repositories, and then configuring GlassFish 2.1 to connect and display them. Mercurial is an open source source control system. GlassFish is an open source Java™ application server. I will not explain how to install Mercurial, nor GlassFish. The respective sites have excellent documentation on how to install them.

Creating Repositories

1. Create a directory called /repos.

2. Using the command prompt, navigate to the /repos directory and issue the following commands.
hg init alpha
hg init beta
hg init omega
This will create three new Mercurial repositories.

3. Change to the respective repositories and add a file called hgrc to the .hg directory. This file should contain a contact and a description of the repository. Here is a representative example from my alpha repository.

[web]
contact = John Yeary <jyearyATbluelotussoftwareDOTcom>
description = Alpha source code repository.
This information will be displayed on our main page.

NetBeans 6.5

1. Using NetBeans create a new Project -> Java Web ->Web Application.

2. Call the project Mercurial.


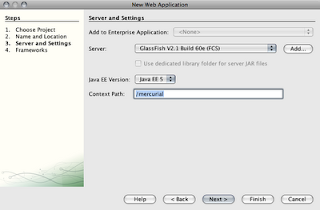
3. The default Context Path is the project name. We will change it from /Mercurial to /mercurial.


4. Click Finish. This will create a basic web project which will compile to a nice WAR file for deployment on GlassFish.

5. We will begin to modify our project by removing the index.jsp file.

6. Next go to the Web Pages -> WEB-INF directory. In here you will find the default web.xml file. Open it in the editor.

7. Follow the directions from Jean-Francois Arcand's Blog on Enabling CGI support in GlassFish. An example of my web.xml file is displayed below. This will enable the CGI servlet which is used by Mercurial to display the repositories.
<?xml version="1.0" encoding="UTF-8"?>
<web-app version="2.5" xmlns="http://java.sun.com/xml/ns/javaee"
xmlns:xsi="http://www.w3.org/2001/XMLSchema-instance"
xsi:schemaLocation="http://java.sun.com/xml/ns/javaee http://java.sun.com/xml/ns/javaee/web-app_2_5.xsd">
<servlet>
<servlet-name>cgi</servlet-name>
<servlet-class>org.apache.catalina.servlets.CGIServlet</servlet-class>
<init-param>
<param-name>debug</param-name>
<param-value>0</param-value>
</init-param>
<init-param>
<param-name>cgiPathPrefix</param-name>
<param-value>WEB-INF/cgi</param-value>
</init-param>
<load-on-startup>5</load-on-startup>
</servlet>
<servlet-mapping>
<servlet-name>cgi</servlet-name>
<url-pattern>/cgi-bin/*</url-pattern>
</servlet-mapping>
<session-config>
<session-timeout>
30
</session-timeout>
</session-config>
<welcome-file-list>
<welcome-file>index.jsp</welcome-file>
</welcome-file-list>
</web-app>

8. Next we will create a sub-directory WEB-INF called cgi. This will contain our CGI applications.

9. Obtain a copy of the source code for your version of Mercurial. Locate the hgwebdir.cgi file and copy it to your WEB-INF/cgi directory.

10. Create a file called hgweb.config in the WEB-INF/cgi directory. The hgwebdir.cgi application expects this file to exist and point to your repositories. The hgwebdir.cgi file contains help on configuring the file. Here is an example configuration based on our setup.

[paths]
/ = /repos/*

This will allow the hgwebdir.cgi to map all repositories located in the /repos directory.

11. Next we modify the web.xml file and change the welcome files list to point to the application.
<welcome-file-list>
  <welcome-file>cgi-bin/hgwebdir.cgi</welcome-file>
</welcome-file-list>
12. Click on Run and you should be delighted to see the following.


Issues

If you encounter any errors, or nothing appears, you can enable debugging for python by un-commenting the following lines in the hgwebdir.cgi file.
# Uncomment to send python tracebacks to the browser if an error occurs:
#import cgitb
#cgitb.enable()
You may also enable debugging on the cgi application by changing the debug parameter to 1 in the web.xml file
<init-param>
<param-name>debug</param-name>
<param-value>1</param-value>
</init-param>

Here is a copy of my NetBeans Mercurial Project. It is itself a Mercurial repository.

Wednesday, April 01, 2009

JSF 1.2: Visual JSF ( Project Woodstock) Table Row Striping, or Alternating Row Colors

I recently encountered some issues with setting the class attribute of my table rows using Javascript on Internet Explorer, and Firefox 3.0.8. The class was designed to change the background of the <td> elements of my table. I finally decided that I would try using the TableRowGroup styleClasses tag to try to accomplish the "striping", or alternating the color of odd and even rows in the table. The tag description indicates that it is as easy as adding two style classes which will accomplish this. This is not quite true if you have tried it.

The CSS for the table component in Woodstock has defined a background-color of white (#FFFFFF). This makes overriding it quite difficult.
I accomplished overriding it by placing the same element in the stylesheet.css file located in the project.

Here is what I added:
I then added my new css classes to the TableRowGroup as seen below.


The final result was to produce an elegent table with alternating colored rows.


Here is a link to the NetBeans 6.5 project on BitBucketTableAlternateRowStriping

Wednesday, February 18, 2009

Drupal on GlassFish using Quercus

I will explain how to get Drupal running on GlassFish in 10 minutes.

Requirements:
Database:
  1. Create the Drupal user in the database.
    GRANT SELECT, INSERT, UPDATE, DELETE, CREATE, DROP, INDEX, ALTER ON drupal.* TO 'drupal'@'localhost' IDENTIFIED BY 'drupal';
    Note: This is not secure and should only be used for demo.

  2. Create a new database in mySQL called drupal.
    create database drupal character set utf8;
Quercus:

Download and extract the quercus-3.2.1.war file.
jar -xvf quercus-3.2.1.war WEB-INF
Drupal:
  1. Download and extract Drupal 6.9
  2. Copy the WEB-INF directory and files from the Quercus into the Drupal directory.
NetBeans:

  1. Create a new project in NetBeans. Choose Java Web and Web Application with Existing Sources.


  2. Fill in the Name and location properties for the project.

    Note: Please make sure that you choose a different folder for the project files. Please see the image below as an example.


  3. Next select the application server, and set the Context Path. I renamed my context to /drupal


  4. Next select the Web Pages folder. This should be the top directory of the Drupal directory you extracted. This is the directory which contains index.php.


  5. Click Finish

  6. Open the project and navigate to the Web Pages folder. Navigate to the sites --> default directory. Right click on the default.settings.php file and copy. Paste the file back into the directory. Right click on the file it should be named something like default.settings_1.php, rename the file to settings.

    Note: NetBeans will append the .php to the end of the file.


  7. Right click on the project and select Properties. This will bring up the project properties. Select the Libraries Category. Here you will see the files that were included from Quercus 3.1.2 which were in the WEB-INF/lib directory.

  8. Click on Add Library and select MySQL JDBC Driver. Click OK.


  9. Finally Run Main Project (F6).


Drupal Configuration:

If you were successful, you should see the Drupal Configuration page.


  1. Select Install Drupal in English (You may choose differently based on your requirements).


  2. Fill in the database with the information we created earlier.

    • Check mysqli
    • Database Name: drupal
    • Database Username : drupal
    • Database Password: drupal


    Click Save and Continue.


  3. That will complete the database installation and bring up the Site Configuration Screen. Fill in the values and click Save and Continue.


  4. Finished. You should get an Installation Complete screen. Click on your new site.

    Note: My installation has an error message because I don't have SMTP configured on my Mac.


Congratulations! You have Drupal 6.9 running on Quercus 3.1.2 on GlassFish 2.1.

Friday, February 06, 2009

Book Review: Pro Netbeans IDE 6 Rich Client Platform Edition

Disclaimer: Adam Myatt and I have been on the JavaOne 2008 and 2009 Tools and Languages Review Committee. I don't believe that there is any predjudice for/against the book, but in the interest of disclosure I thought it important to mention. Don't you wish politicians had that much honesty?

I had the pleasure of reading the Pro NetBeans IDE 6 Rich Client Platform Edition book by Adam Myatt. I had read it a while ago, but I did not have the time to do a review on it. The book is sixteen chapters long, and covers a variety of topics from download and installation to developing rich client applications. The book covers version 6/6.1 of NetBeans, but there is significant applicability to version 6.5 to make it worth purchasing.

The book has a primary target of new users to the NetBeans IDE. It is designed to take you from novice user to power user in a systematic organized way. The book is sufficiently modular that you can choose to read individual modules, or go from cover to cover. The chapters stand on their own so that you do not need to worry about missing something in a previous chapter if you decide to browse.

Based on the easy reading style and effectiveness of communicating complex topics, I would give the book (4/5) stars.

Chapter 1:
Downloading, Installing, and Customizing NetBeans

This chapter covers the basics of installation, and explains a number of options available for configuration.

Chapter 2:
The Source Editor

Here we cover the basics of the source code editor and its windows. It also covers some interesting features of the source editor like the error stripe and annotation glyphs. The error stripe allows the user to go directly to any errors which are in the code. The annotation glyph provides the user with suggestions. These may be as simple as reminding you to mark @Override on an overridden method.

One of the best discussions in the chapter has to do with built-in and custom macros you can create to simplify coding tasks. This was a great explanation of how it works.

Chapter 3:
Code Completion and Templates

Code completion is what makes an IDE so valuable. This chapter covers the NetBeans code completion technology in detail.

It also covers code templates which are a boon to any developer who learns to use them. Adam really explains this in a manner that makes them easy to learn and use.

Chapter 4:
Debugging

I thought I was fairly sophisticated in my use of debugging. This chapter made me feel inadequate. After reading it and implementing some of the ideas, I feel I am back to being an expert.

Note: I found one error on page 95. The third paragraph has Run --> Run File -->Run Debug Evaluate Expression. It should be Run --> Run File --> Run to Cursor.

I would buy the book for this chapter alone.


Chapter 5:
Profiling

This chapter covers profiling for performance. Sun and NetBeans has spent a lot of time creating this technology (like DTrace), instrumenting, and providing tools. It is a shame that they really have not promoted these capabilities to the developer community.

Adam has spent a lot of time detailing profiling and providing great examples to get you into it. His explanations may be enough to encourage developers to use these really great tools.

This chapter also includes how to profile remote JVMs and application servers. It is a really slick explanation and demo.

Chapter 6:
Managing Version Control

This chapter covers version control system implementations in NetBeans. It covers CVS and Subversion. Since the book was written, the Subversion implementaion has had numerous improvements. NetBeans 6.1 and 6.5 also include support for Mercurial.

Chapter 7:
Generating and Accessing Javadoc

This chapter covers Javadocs and tools in the IDE to make Javadocs easier to create. I must admit I thought they were already easy, but there are some features to make it even easier including code completion.

Chapter 8:
Managing Builds with Ant and Maven

This covers Apache Ant and Maven implementations in NetBeans. Adam covers some of the features of Ant with a high degree of skill. He covers the NetBeans implementation very well.

The section on Maven is a weak spot in the book. In fairness, the version of NetBeans which the book was based on had poor Maven capabilites. Version 6.5 of NetBeans has much better tools for handling Maven.

Chapter 9:
JUnit Testing

This chapter covers JUnit testing. This is another chapter that is a little to weak. NetBeans 6.0, 6.1, and 6.5 have some really great implementations for doing JUnit testing. This chapter does not do it justice.

Chapter 10:
Refactoring

This chapter covers refactoring. NetBeans has some really great refactoring tools.

JetBrains IntelliJ IDEA is the gold standard for refactoring, but each generation of NetBeans brings it one step closer.

There are some comprehensive explanations of how to use the refactoring tools in NetBeans. If you want to master the IDE, this chapter, and chapters 4, and 11 are a must.

Chapter 11:
Code Quality Tools

This chapter covers some of the really great plugins that are available for NetBeans including: Checkstyle, PMD, and SQE (FindBugs). If you are not using these static analysis tools in your code, you are doing yourself and customers a disservice. This chapter covers the tools in enough detail to get your interest. These plugins are in constant development, and you should check the latest versions and updates out.

These tools will make your code much better. You as a developer need to understand why. When Checkstyle marks code as a "Magic Number", you need to read the explanation. Understanding the why will help you to avoid these problems in your future code.

Chapter 12:
Developing JRuby/Ruby on Rails Applications

This chapter covers developing JRuby, and Ruby-on-Rails (RoR) applications using NetBeans. The chapter is not designed to teach you to program in Ruby, but to show you what features are available in the IDE. The NetBeans support for Ruby is fantastic. A number of other IDE developers are trying to emulate the functionality. I think that most Ruby developers will find that the support is a quantum leap in terms of ease and functionality over more traditional tools.

There is a note on page 297 which explains a really neat feature. If an existing application is deployed using Webrick, or Mongrel on port 3000, the IDE will increment the port number to prevent port in use errors.

Chapter 13:
Developing Web Applications

This is a long chapter covering web application development. The first part of the chapter covers the functionality of the IDE in terms of what features it provides. This includes items like the Javascript and CSS editors. Both of these tools are really useful.

The Javascript editor and debugger have been vastly improved in NetBeans 6.5.

The CSS editor with a change viewer make designing, or changing a CSS file a snap.

The chapter also covers the application server features and HTTP monitor. Specifically it covers Apache Tomcat and GlassFish. It explains how to add additional servers like JBoss, or Websphere to allow those server deployments.

The second half of the chapter covers web application development frameworks. The section covers Struts, Struts 2, Visual Java Server Faces (JSF) (Project Woodstock), and JMaki.

The Struts and Struts 2 section is relatively small. It provides the user with the basics of how to create and use Struts based projects.

The section on Visual JSF development is extensive and makes the book worth purchasing. The explanation on how to get started will set you on the right path. The section on visual data binding is elegant and simple. It also covers the Visual Database Query Editor. This functionality has been updated in NetBeans 6.5, but the explanation here still applies.

Note: Visual JavaServerFaces (JSF) development in NetBeans has been frozen. The promise of Project Woodstock in a version 4.3 release and beyond has been abandoned officially by Sun. The current supported version is 4.2. It will continued to be supported by the NetBeans team for the foreseeable future. The push by Sun is to provide support using third party providers of JSF components. The best of these providers is ICEFaces. They have a really great set of components, and have provided a transition plan for Project Woodstock developers.

The section on JMaki is too brief to really provide a great explanation of this great technology.

Chapter 14:
Developing Web Services: JAX-WS, SOA, BPEL, and RESTful

This chapter covers JAX-WS, SOA, BPEL, and RESTful services. These projects have undergone extensive updates which makes the information here slightly dated. The basic procedures are the same, but there are better tools in NetBeans 6.5.

Chapter 15:
Developing GUI Applications

This chapter covers GUI application development. It is the best aggregation on the subject I have seen. There are a number of tutorials on the NetBeans site, and some good explanations of the features, but this is the best explanation I have seen. There is a great tutorial example of how to use the various components of the IDE to do visual Swing development. I was impressed and learned some new things too.

There is a section on the Swing Application Framework (JSR-296) which is the best I have seen. This technology is supposed to make Swing development easier. I used the information in here to create an enterprise wide application in 1/4 of the time it normally takes. It was also less error prone since the framework handles threading and concurrency issues.

Note: On page 427 there is a code example that has the user add a showHelloWorld method. There is a missing variable that needs to be added. It should have:
private JDialog helloWorldBox;
There is another section on Beans Binding (JSR-296) which covers another ease of use technology for Swing. It allows the developer to bind data components to Swing components in an easy and consistent way. The explanation here of the technology combined with JSR-295 makes Swing development easy. It also covers the Database Table Editor to make modifying tables easy to use as part of the binding process.
Note: Page 431, last paragraph indicates that you can use the DOUGHNUTS table node to use the table editor, this is not correct. You must open the table, and select a column to open the table editor.

Note: Page 442, to use the validator you have created, you must compile the code first. Either by selecting the class itself and compiling it, or clean and building your project.

I personally found that the GUI project development section was crucial to me for using these great new technologies, and development of a successful enterprise Swing application.

Chapter 16:

Developing Rich Client Applications

This chapter covers the development of Rich Client Platform applications using the NetBeans platform as the base for your application. This section provides an introduction to the technology, and the basics of how to create your own branded rich client applications.

Summary:

I would recommend this book to anyone who wants to learn more about the NetBeans IDE.

Based on the easy reading style and effectiveness of communicating complex topics, I would give the book (4/5) stars.

Sunday, February 01, 2009

Quercus PHP 3.2.1 on GlassFish 2.1

I am trying to consolidate a number of applications running on various platforms to GlassFish, if possible. So far I have been incredibly successful with Ruby using JRuby. Our project tracking software (bugs/news/wiki/forums/repository browser) are running on Redmine using JRuby.

Based on the success of using Ruby (RoR), I decided to trying moving some PHP applications over to GlassFish.

I read a great blog article by Ludovic Champenois called 100% Java Quercus PHP engine running in GlassFish Java EE 5 Application Server It describes how to use an open source engine called Quercus from Caucho. I tried to follow the directions, but could not get it to work. I imagine because the versions of GlassFish application server and Quercus may have been different. I was not deterred.

I came across a follow-up article by Arun Gupta called PHP in GlassFish using Caucho Quercus. This article was the missing link. The major difference being the placement of the jar files in the domain/domainXX/lib directory.

Here are the application versions I used to get a functional Caucho Quercus PHP implementation running on GlassFish v 2.1

Mac OS X 10.5.6 (Intel x86)

  • GlassFish v 2.1 Build 60e ( 2.1 FCS)
  • Quercus 3.2.1
  • Java(TM) SE Runtime Environment (build 1.6.0_07-b06-146) Java HotSpot(TM) 64-Bit Server VM (build 1.6.0_07-b06-56, mixed mode)

Mac OS X 10.5.6 (PowerPC)

  • GlassFish v 2.1 Build 60e ( 2.1 FCS)
  • Quercus 3.2.1
  • jsr223-api.jar (Project Phobos) Required for Java SE 5.
  • Java(TM) 2 Runtime Environment, Standard Edition (build 1.5.0_16-b06-284) Java HotSpot(TM) Client VM (build 1.5.0_16-133, mixed mode, sharing)
When I created my projects I used the following web.xml It is based on the example web.xml in the Quercus 3.2.1 war file.

<?xml version="1.0" encoding="UTF-8"?>
<web-app version="2.5" xmlns="http://java.sun.com/xml/ns/javaee"
xmlns:xsi="http://www.w3.org/2001/XMLSchema-instance"
xsi:schemaLocation="http://java.sun.com/xml/ns/javaee http://java.sun.com/xml/ns/javaee/web-app_2_5.xsd">
<session-config>
   <session-timeout>
       30
   </session-timeout>
</session-config>

<description>Caucho Technology's PHP Implementation</description>
<servlet>
   <servlet-name>Quercus Servlet</servlet-name>
   <servlet-class>com.caucho.quercus.servlet.QuercusServlet</servlet-class>
<!-- Specifies the encoding Quercus should use to read in PHP scripts.
    -->
<!--
    <init-param>
      <param-name>script-encoding</param-name>
      <param-value>UTF-8</param-value>
    </init-param>
    -->

<!-- Tells Quercus to use the following JDBC database and to ignore the
         arguments of mysql_connect().
    -->
<!--
    <init-param>
      <param-name>database</param-name>
      <param-value>jdbc/test</param-value>
    </init-param>
    -->

<!--
    <init-param>
      <param-name>ini-file</param-name>
      <param-value>WEB-INF/php.ini</param-value>
    </init-param>
    -->
</servlet>

<servlet-mapping>
   <servlet-name>Quercus Servlet</servlet-name>
   <url-pattern>*.php</url-pattern>
</servlet-mapping>
<welcome-file-list>
   <welcome-file>index.php</welcome-file>
</welcome-file-list>
</web-app>


This arrangement will allow you run a large number of applications including XWiki, and Drupal. Unfortunately for me, it can not run phpLDAPadmin which I needed.

Saturday, January 24, 2009

Building Collaborative CRUD Applications With ICEfaces and NetBeans Tutorial

I spent yesterday afternoon getting the ICEFaces modules installed in NetBeans 6.5 and trying the Building Collaborative CRUD Applications With ICEfaces and NetBeans tutorial on the ICEFaces site. This time, unlike the last time I tried it, it worked with some minor issues.

Note: Read the instructions carefully. The images do not show how to do everything.

When creating the Editing Form make sure that when you drag a new ice:form is NOT inside the first ice:form. Dragging and dropping the form on the page will automatically embed it in the other form. Use the Navigator tab in NetBeans to drag it outside of the first form.


Adding AJAX Push

Items #3 and #4: has you create a bean called RenderManager, and then use it in Item#4. The problem is that in one case it is called RenderManager and the other is called renderManager. A big difference. Fix it by calling the bean renderManager.

Configure The Grizzly ARP Engine

I was using GlassFish version 2.1 so I did not need to configure the Grizzly engine. I did however need to Comet support to the http-listener in the domain.xml file.

<property name="cometSupport" value="true"></property>

Thoughts

I was impressed with the ease of doing the tutorial. I would suggest that the ICEFaces folks update the tutorial for NetBeans 6.5 and fix some of the minor deficiencies as I noted above.

Wednesday, January 14, 2009

Swing Listener Example

I was asked about using a listener to handle Swing GUI events. I created a simple example which uses a PropertyChangeListener that captures events. You can see the KeyEvents output to the System.out

Here is a link to the NetBeans 6.5 project SwingGUIListenerExample

LDAP Digest Authentication SunOne Directory Server

I was experimenting with Digest (DIGEST-MD5) authentication using SunOne Directory Server. There are not a lot of notes to explain how to use it, nor is the Sun tutorial on JNDI very helpful.

Note: Here is the important thing to remember. You can ONLY use DIGEST-MD5 with plain text passwords. For example, if the passwords are set using SSHA (Secure Salted Hashing Algorithm), you will need to change them to plain text to use it. This is not something I would recommend doing, because DIGEST-MD5 is not as secure as SSHA.

I would recommend using SSL without using DIGEST-MD5, and keep the passwords secured.

Popular Posts