Friday, December 06, 2013

JSF 2.x Tip of the Day: How Do I Remove a @ManagedBean ?

A colleague asked me how to remove a @SessionScoped @ManagedBean from a JSF application. We both thought about using the code below, and in fact it works, but it left me feeling that this was too specific.


I thought a better approach would be to just "find" the bean and set it to null. Using an ELResolver I thought would be better since I could just look for a bean in a more general way.

References

Here are some articles that have some additional ideas. The comment in the first article turns out to be the same method we came up with for removing it from a session.

Thursday, December 05, 2013

JSF 2.x Tip of the Day: Determining JSF Implementation and Version

I work on an application that works on multiple application server platforms. As a result, we often find ourselves at odds with the implementation details. A major example is WebSphere which has Apache MyFaces and OpenWebBeans (CDI) which is considerably different from GlassFish with Mojarra and Weld. This has resulted in us having to code around differences in the platforms. This is not sustainable. We decided to set the target JSF layer to use 2.1.x since the application must run easily on EE6/7 containers. We also decided to use Mojarra (JSF RI) as our implementation. So you may be asking how this fits into the title of today's topic. Well the implementations of JSF vary over the containers like GlassFish, Weblogic, JBoss (WildFly), and WebSphere. The mechanism to override the container implementation also varies. I wanted a simple way to validate that the version of JSF (in this case 2.1.26) was overriding the container.

Apache MyFaces has a really easy mechanism for determining the version, but Mojarra does not have something like a "Version" class. I went looking through the Mojarra implementation looking for a way to determine it easily. I then asked Manfred Riem, Oracle, how to determine the version. He sent me a response that I thought was unbelievably simple and I thought I would share it. I have also added it to my library of utilities I have for JSF.

JSF Utilities Library on Bitbucket: jsf-utils

Here is the code for your enjoyment. Simple and sweet...
So I created a simple web page that displays the information, and I can be sure that we have successfully overridden the application server's implementation.

Update: If you are using OmniFacesframework, the Faces class has a method to determine implementation version.

Sunday, December 01, 2013

Minecraft Server on Amazon Elastic Compute Cloud (EC2)

Introduction

I recently setup a Minecraft Server on Amazon Elastic Compute Cloud (EC2) for one of my sons and his friend. It was an experiment for use with a larger group of Cub Scouts in my Bear den.

I signed up for the free hosting for a year from Amazon. The free instance has some limitations, but will work fine. The biggest issue is the amount of ram in the free micro (t1.micro) instance is about 613MB. This is much smaller than the recommendation of 1024MB on the Minecraft website, but worked with a small group. You may need to go to the next tier (m1.small, or m1.medium) for a bigger group. Those instances are not in the free tier, but are $0.06/per hour, and $0.12/per hour respectively at the time of this writing.

The details below are simple, and are for use with an Linux based Amazon Machine Image (AMI). If you are not familiar with the terminology, it just means the operating system image for our virtual machine which we will be creating. You can create a Windows based AMI. The steps would be similar to the ones detailed below. If there is a need I may write another article on how to do it with a Windows AMI.

The process has a number of steps, but it actually takes about 5-8 minutes to get it setup. These directions are detailed just in case you need them.

Requirements

Instructions

  1. Sign up for a free Amazon Web Services Account
  2. Sign-in to the Amazon Management Console and select EC2 from the list of services.
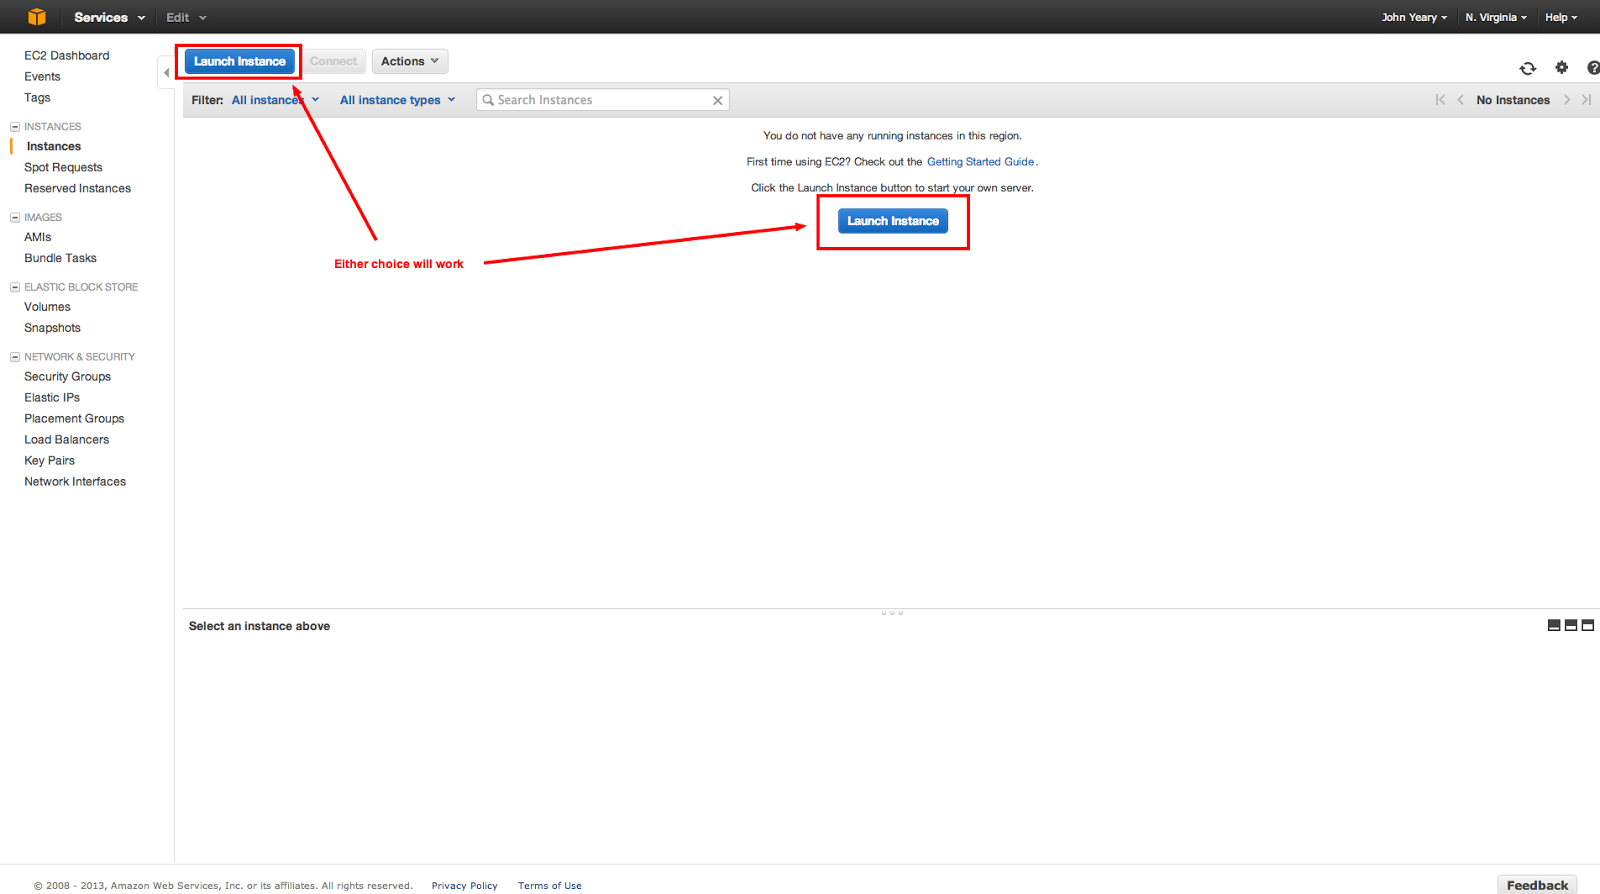
  3. You should see a screen similar to the one below. Please select a region closest to your location, e.g. I live in South Carolina so I will use US East (N. Virginia). This will reduce the network latency since it is closer.
  4. Next create a key-pair. These are the cryptographic keys used to login to the service.
    The pem file that is downloaded should be kept in a safe location. You will need it later. I called my key pair Minecraft.


  5. Next select Volumes. We will be creating an Elastic Block Store (EBS) that will house our Java installation, and Minecraft server. The EBS will survive our instance being shutdown, and allow us to use it later if we want to run another game server. The maximum size for the free tier is 30GiB. We don't need anything that big. Create a volume in my case I will create one with the following values:

    Volume Type: Standard
    Size: 8 GiB
    Availability Zone Any
    Snapshot: No Snapshot
    Once the volume is created, select it and go to the Tags tab and give it a name. I called mine minecraft-world. Write down the Availability Zone you selected, you will need this when you create your AMI.


  6. Next we will create our AMI instance. This will require a couple of steps in detail. Select Instances and Launch Instance.

  7. Select free instances, Ubuntu Server 13.10 (I also tested with Amazon Linux AMI 2013.09.1), 64-bit, and Select.
  8. Next: Configure Instance Details.
  9. Select the Availibility Zone that you chose for your EBS. In my case it is us-east-1cNext: Add Storage.
  10. Next: Tag Instance
  11. Give the instance a name. I called mine Minecraft Server and Next: Configure Security Group.
  12. Note: This step is critical to get correct, otherwise you will not be able to connect to the instance. In my case, we are on a private LAN connected to a wireless router to the Internet. All of the boys connect to the router on their laptops via Wi-Fi. We will be using the EXTERNAL IP address of the router. Amazon should discover this automatically, if you select the source as My IP. Your circumstances may be different. If you have people connecting from remote locations, you will need them to provide their external IP addresses and add them as separate rules.

    1. Create a new security group
    2. Protocol: All TCP
    3. Port Range: 0-65535
    4. My IP: x.x.x.x/x (This should be auto-detected).
    5. Review and Launch

  13. Review the page, and select Launch.
  14. Select a key pair to use. We will use our Minecraft key and Launch Instances.
  15. Congrats you have setup and launched an EC2 instance!View Instances.
  16. You should see your instance running.
  17. Select Volumes again, and click on the minecraft-world volume you created earlier. Select Attach Volume  from the Actions menu. Select the Minecraft Server instance, the device should default to /dev/sdf, and press Yes, Attach.

  18. Select the instances tab, select the Minecraft Server and press Connect. This will bring up a screen with connection instructions.
  19. Open a terminal, or connect to the instance using a tool like PuTTY using the instructions provided. When connecting you may get a warning about the key fingerprint, please choose yes.
  20. Once connected, we will need to setup our EBS store. Note: This will only need to be done once since it is the first time. If you are connecting subsequently skip to Step 21. In the terminal issue the following command:

    This will create format our disk.
  21. Mount it at the /mnt mount point on our os.

  22. Next we will open another terminal on computer and go to the directory where our Java Server JRE and Minecraft server instance jar is located. Use scp to copy the files to the server as shown below. Note: the address (the part after ubuntu@) will be the same as your connection string earlier. The :/home/ubuntu is directory we will copy it to.

  23. From our SSH terminal, we will copy the files from our /home/ubuntu directory to /mnt and configure them as follows.

  24. Next we will modify the .bashrc file to point to our new JAVA_HOME and add the JAVA_HOME to our PATH.

    Add the following to the bottom of the file and save.
  25. Next we will set our new values in the shell, and check to see if Java is available.
    You should see something like this that indicates that Java is correctly installed:
  26. Finally we are ready to start the Minecraft server. The command below is for our current configuration. If you setup your server using a m1.small, or m1.medium instance as noted in the introduction, then use the the alternate command.
    ALTERNATE server command for m1.small and m1.medium

    You should see something like this:
  27. Test it out with your Minecraft Application using the public IP address of the server.


Congratulations, you have a Minecraft server!

Conclusion

Setting up a Minecraft server is easy and fun for adults and children alike. If you have questions, or comments please let me know.

Saturday, November 30, 2013

Java EE 7 Tip of the Day: Web Application Lifecycle Listeners

Introduction

I have been trying to come up with a way to highlight these fascinating classes in a way that demonstrates their power and usefulness. In my post Java EE 7 Tip of the Day: Programmatic Control of Session Tracking with ServletContextListener I highlighted the use of the ServletContextListener to set session tracking programmatically. However, there are a number of listener classes that can help you. Here they are in generally decreasing scope:

Web Application Lifecycle Listeners

ServletContainerInitializer

The ServletContainerInitializer is a special case that must be registered with the Service Provider Interface (SPI) loading mechanism. Please see the Javadocs for more details on its usage. That is a topic for a different post.

ServletContextListener

The ServletContextListener has been previously mentioned in another post as noted above. This listener is notified of lifecycle changes, e.g. context initialized and destroyed. This gives the developer the opportunity to perform application setup such as setting a logger, or enabling other listeners. It also provides a clean mechanism to handle application cleanup when an application is shutdown, or disabled.

ServletContextAttributeListener

The ServletContextAttributeListener listens for events that occur when attributes are added, modified, or removed from the ServletContext. This could be used to modify those attributes, or perhaps log them. Interestingly, the order in which the implementations are invoked is not specified.

HttpSessionListener

The HttpSessionListener listens for session creation, and destruction events. I have found this to be one of the most useful classes in a web application. This can be used to set up a persistent data connection while the session is valid, and close the connection when the session expires, or is invalidated.

The listener implementations are invoked in the order of declaration, and destroyed in reverse order. A way to think of this is like the layers of filo dough. If you go from top to bottom, then you must reverse order from bottom to top.

HttpSessionAttributeListener

The sibling interface HttpSessionAttributeListener is the second most used class in my toolbox for listeners behind the ServletContextListener and HttpSessionListener. I have found that I often need to examine when attributes are added, modified, or removed from a session. This is the tool I use to manage that.

Keep in mind that the HttpSessionAttributeListener behaves like the ServletContextAttributeListener in that the order in which the implementations are invoked is unspecified. This means that you can not rely on a specified ordering to take place across containers. Usually, the ordering is consistent on a container basis, but the contract is explicit that the ordering is undefined.

HttpSessionIdListener

This is a new to Java EE 7. The HttpSessionBindingListener is used to handle when a HttpSession ID changes. This is usually the result of a HttpServletRequest.changeSessionId() command. This was added in Java EE 7 to help solve a security issue called Session Fixation. Typically, you would change the session id after the user successfully authenticates. This can help you with this transition. Otherwise, you need to do a lot of work to make it happen. In this case, it is just great to be able to let the API handle it.

This interface will allow you to modify your application based on the ID change. Please note that the order in which the implementations are invoked is not specified.

HttpSessionBindingListener

The HttpSessionBindingListener listens for binding events. This occurs when an object is bound, or unbound from a session. There are a couple of examples from BalusC on Stackoverflow. Here are a couple: Getting SessionScoped bean from HttpSessionListener? and How to access HTTP sessions in Java. These are just a couple of examples on its usage. I personally have never used it directly. I was just thinking I should come up with my own example for it.

ServletRequestListener

The ServletRequestListener is another listener that I use. However its usage is not as frequent as the other aforementioned ones. I usually end up checking the ServletRequest with an instanceof for HttpServletRequest and casting it. This listener will allow you to modify an individual request.

Since it has every request pass through it, you should make sure that there is no excessive overhead in the listener such as database lookups, or excessive logging. Abuse of this listener can result in massive performance issues.

ServletRequestAttributeListener

Finally, we have the ServletRequestAttributeListener that listens for request attribute changes. The same warning as noted in the ServletRequestListener applies here. Any excessive overhead will result in dramatic performance decreases.

Like the other attribute listeners, this listener does not have a specific order in which they are invoked.

Code Examples

The code for this project was developed using NetBeans 7.4, Apache Maven, Mercurial, and is hosted on Bitbucket. The code in the examples is somewhat contrived, but does demonstrate the functionality of the listeners.

I strongly recommend downloading the code, executing it, and looking at the output. It will give you a better picture of how the code works, and also show you some hidden "features" of your application that you may be unaware of.

The source code can be downloaded from here: web-application-listeners.

ServletContextListenerImpl.java


ServletContextAttributeListenerImpl.java


HttpSessionListenerImpl.java


HttpSessionAttributeListenerImpl.java


ServletRequestListenerImpl.java


ServletRequstAttributeListenerImpl.java


Conclusion

Web application lifecycle listeners are essential tools for the web developer. If you are not using them, you should consider them to simplify your web development. Hopefully the explanations and code provided help you along your path to becoming a great developer.

How to use PowerMock and Mockito to test static and private methods

Introduction

This article is not another diatribe to tell you the importance of unit testing. I think we can all agree that it is important. This is about solving an issue that comes up frequently in unit testing. How do I test static methods, and how do you test private methods.

Until PowerMock, most developers were told you can't really test a static method per se. I will show how to do it below.

A common mechanism for testing private methods is to change them to protected. This is not a good solution for a number of reasons. So how do we test them? Again, PowerMock has come to the rescue.
I want solutions. I use Arquillian, but I am not such a zealot that I will chant the mantra that mocking is evil and should not be done. It is a means to an end. That being said, we use Mockito which in my professional experience is the best current mocking framework available. It is easy to setup and use.
However, Mockito has its limitations. Two are mentioned above. The fine developers of PowerMock have come up with an additional framework to use in conjunction with Mockito to get around the limitations.

Solution

The Apache Maven sample code for the project was developed using NetBeans and can be found on Bitbucket here: unit-testing-mockito-powermockito.

Since I am a Apache Maven user, I simply add the relevant frameworks to my pom.xml as shown below: Once the test frameworks are in place, I can use the PowerMockRunner to help me with my testing. The following are some simple classes to demonstrate how to test. The first is a class to generate UUID values for IDs.

IdentityUtilities.java


Next, I need a class to represent a person. I am interested in testing the private method generateId.

Person.java


Finally, we need our PersonTest class to test our Person object. The explanation follows the code.

PersonTest.java


The @RunWith(PowerMockRunner.class) annotation tells jUnit that we are using an extension to handle testing of this class. This tells jUnit to use this test runner instead of its own test runner.
The @PrepareForTest({IdentityUtilities.class, Person.class}) serves multiple purposes here. The first is to tell PowerMock that we need to do some preparation of the classes to instrument them for our testing. Classes defined using this annotation are typically those that needs to be byte-code manipulated. This includes final classes, classes with final, private, static or native methods that should be mocked and also classes that should be return a mock object upon instantiation. IdentityUtilities.class is our class with a static method, and Person.class contains our private method.

The first test testInitialize() behaves like any other Mockito test with the exception that we mock it using PowerMockito.mockStatic(IdentityUtilities.class) to initialize it. This makes testing static methods as easy as any other Mockito test.

The second test requires a little more explanation. In this case, we spy on the object we are creating. This allows us to instrument it. Then using the "spied" instance we use PowerMockito.when(instance, "generateId").thenReturn("UNIT-1A") to tell the framework that when the private method "generateId" is called, we want to return a specific value. Then we initialize the instance, and check the value is what we expected. Finally, we can optionally check to make sure that the method was actually called by using verifyPrivate(instance).invoke("generateId").

Conclusion

Don't short change yourself, and don't modify your beautifully architected code just to satisfy a testing framework. Find a framework like PowerMock to help you test your code as written instead. You should only change the code because you want to do so, or because you discover flaws in it.

Friday, November 29, 2013

Cleaning Multiple Maven and Ant Projects

I am trying to put a bunch of my code on my Google Drive to back it up. I have had a couple of bad experiences lately around failed hardware, and needing some code that I could not get to from a remote machine. I copied all of the projects to the Google Drive in the interim. I am not sure if this is a good idea since the builds in the IDE seem cause it some issues, but until I have everything on Bitbucket, I will need to have it on the drive.

Anyway, I was looking for a way to make sure all of the projects were clean so that I could conserve space, save money, and keep the scanning to a more minimal level. So how do you step through each directory and issue commands to clean the projects. Here are my examples:

Maven


Ant


Please note that I set the maxdepth to 1 so that it would not recursively keep digging down directory levels invoking the command. The -type d option is to only examine directories starting from the current directory. The cd{} shell command tells the script to go into the directory that was found and execute the following command.

I hope that this might save someone a few minutes.

Monday, November 25, 2013

Java EE 7 Tip of the Day: Programmatic Control of Session Tracking with ServletContextListener

Have you ever had a developer modify a web.xml file to change session configuration? Have they forgotten to change it back from "developer mode" back to "deployment mode"? I am sure all of you have done something like that at some point in time. I am no exception. This tip of the day comes from that very issue.

The issue here is that we want to control session tracking. In the web.xml file you may have something that looks like:

OK, let me re-phrase that. You were expecting that, but instead you have:
This is a problem. You see we are trying to be more secure around our session and having the JSESSIONID in the URL is not helping much with that. Well, we can perhaps keep our application safe, and frustrate our developer slightly if he doesn't figure out this little bit of magic. We can control the session tracking programmatically in an "obvious" well-known location. We can enlist a ServletContextListener to help us.

The ServletContextListener can help us by listening for when our application is being initialized, and set the session tracking back to COOKIE for us.  The implementation is simple, and will help foil the "developer mode-itis" that sometimes infects the code.

ServletContextListenerImpl.java

Note: Even if you didn't have a value set in the web.xml file, this would set it to COOKIE.

Friday, November 22, 2013

ServiceLoader<S> Dynamic Reloading on JEE7 Web Application

Introduction

We had a technical discussion about updating an application on the fly in Java EE. There were a couple of issues that we were trying to resolve. One was a simple way to add functionality to a web application while deployed, and update the running application. It could be functionality like a new module, or service, or something like, the classic example for the ServiceLoader, codecs.

Additionally, we needed to be able to add the functionality without adding another framework to make it happen. It needed to be something that was available in the existing Java SE/EE APIs. Again, the ServiceLoader seemed to be a possible solution.

I did a Proof of Concept (POC) for using a ServiceLoader to accomplish adding additional services to our application. That worked, but required a restart of the server, or a reload of the application at a minimum. This assumes that the application was NOT auto-deployed. It turns out that worked, but really was only a half-measure. I wanted to see if I could solve the dynamic reloading part, and I did.

Solution

Before we see the code, how does it work in general. We use the ServiceLoader which is part of the Service Provider Interface (SPI) functionality of Java. It is a hidden gem for those who need it, and framework creators can take advantage of this simple, easy to use technology. The ServiceLoader is managed by a Singleton that returns an instance of the ServiceLoader that will return our SPI implementations. In my example, I create an interface that is packaged separately in its own jar and is shared between the deployed web application and the service implementations. The ServiceLoader loads this interface and makes the implementations available. The cool part is that our Singleton class also has some cool NIO and NIO.2 help with the ZipFileSystemProvider to load the implementations from newly added jars. It also has some demo of how to use a URLClassLoader to add our new implementations and update the ServiceLoader.

The code for the project can be found here:

Log.java

Here is our interface that is common between the web service and the SPI implementations.


LogImpl.java

This simple interface will allow me to demonstrate the power of the SPI. Here is an implementation of the API.


LogService

This class is the magic behind the SPI and allows us to dyanmically reload the new implementations as we add them to the WEB-INF/lib directory.


com.bluelotussoftware.service.spi.Log

The SPI file located in the META-INF/services directory of your jar file. This is one version, but each implementation would have its own. The file name is the same as the interface, and the listings on each line are concrete implementations.


IndexBean.java

This bean has a cool NIO method of handling uploaded files. So I thought I would add it. Combined with PrimeFaces, it is functional and pretty.

Conclusion

If you need to add some additional functionality to a web application, and reload it on the fly, Give the ServiceLoader a try. You might just be impressed.

Tuesday, October 22, 2013

CDI Tip of the Day: Understanding Injection Techniques

diego_cervo/istockphoto.com
I just finished reading a book Understanding SCA (Service Component Architecture) that covers SCA in detail. The book is a topic for another post. I did come across a gem in the book around Dependency Injection (DI) techniques, and how to make choices around one technique over another.

The three main techniques used for Dependency Injection (DI) are constructor, setter, and field injection. There is also reflection which I will not discuss in this article.

Constructor Injection

This technique calls for injecting the objects used in our class at object instantiation. A significant advantage of this technique is that it makes all of our dependencies explicit at compile time. This also makes testing much easier since we can use testing techniques like mock objects to test. "... Constructor-based injection also enables fields to be marked as final so they cannot be inadvertently changed later on." This can also add some additional performance gains since the object are final and the compiler can optimize this. If you allow mutators for the objects injected, then this performance perk is negated since the object can not be marked final.

A disadvantage of constructor based injection is that the constructors parameter lists can become very large. I would recommend that this approach be considered for 4 parameters, or less. Four parameters can result in 16 test cases (n X n matrix). Additionally, there may be more than one constructor, and dependency injection frameworks deal with it differently. Weld currently only allows DI on one constructor.

Advantages Disadvantages
Explicit Dependencies at compile time. Constructors can become very large
Fields can be marked final Mutable fields lose final advantage
Testing can be simplified The number of parameters produces an n X n matrix of tests

Setter Injection

The next technique is using setter based injection. Typically we have an object with setters and getters where the setter is annotated for injection. This requires that our setters be public, or protected. I would recommend making them public in the absence of reasons to do otherwise. The significant advantage to setter based injection is the ability to change the injected object at runtime. If the method is public, then it can be changed by any object. This could be an advantage, or disadvantage. Also this technique is conducive to testing as well. We can inject mock objects, or use a framework like Arquillian to handle injection during testing.

The disadvantages of using setter based injection "... are two major disadvantages to setter injection. Component (Class) dependencies are dispersed across a number of setter methods, making them less obvious and increasing the verbosity of the code because a method needs to be created for every reference In addition, setter methods make references that should be immutable subject to change because the fields they are assigned cannot be declared final." The second item may not be a disadvantage if  considered closely in your design. The former represents a significant disadvantage in terms of code clarity that has been a hallmark of EE5/6/7.

Another item to consider is that the one of the best practices for developing interfaces is to avoid putting setters in them. Interface design usually only has the getter defined, the setter is an implementation detail that is left out of the contract. This prevents the client code from altering the implementation code accidentally since it should be interacting with the interface contract.

Advantages Disadvantages
Code is more testable Results in less readable code as the number of references increase.
Injection can be changed at runtime. Fields cannot be marked final
- Mutators (setters) are typically not part of the interface contract.

Field Injection

Field based injection is often used in example code found for Dependency Injection (DI) frameworks. "The major advantage of field-based injection is that it is concise." The fields may be public, private, protected, or default. They can not be marked final. This technique avoids large lists of parameters for constructors, and adding setter methods that are not part of the interface contract. The Major disadvantage is unit testing. You need to add a setters, sub-class the object, or use reflection typically. A framework like Arquillian can be used to test, but this adds additional complexity that would not be required for using constructor, or setter injection. The brevity is both an advantage and disadvantage.
Advantages Disadvantages
Concise Difficult to test
- Fields cannot be marked final

Summary

In examining the tables of advantages and disadvantages, you may come to a conclusion that Field injection may be the best choice. This would be premature. In fact, there is clearly no one technique that is better than the other. All have advantages, and disadvantages. Clearly as a developer, or architect you must decide for a given class, or set of classes which technique will meet your requirements. A lot has been said about picking a pattern, and using it consistently throughout your project. I personally find that idea bad. Comparatively, we could say it is like picking a hammer out of a toolbox and using nails everywhere. Sometimes a bolt and nut would work much better. Don't fall into the trap of consistency over what makes sense for your project.

Tuesday, October 15, 2013

JAX-RS Tip of the Day: JIRA and REST Client

Introduction

We are finishing up a release cycle at work. We have switched from Clearcase to Mercurial, and from a home grown bug tracking system to JIRA. We just released our latest software release on Monday, and its time to clean up the repo and JIRA.

Here is the situation. We chose for this release iteration to use a JIRA issue per branch approach. This worked for our situation where we had a number of new users to Mercurial, and JIRA. We could easily manage any issues with the build, or user mistakes. We will re-think the approach now that our team are up to speed on Mercurial.

We also implemented a server side Mercurial trigger that checked if the JIRA issue was assigned to the committer (person pushing to "master" repo). If not, they would not be able to push to the server. That way we could make sure that there were issues associated with check-ins.

So far, I think we did a good job since we yanked the rug from under the staff. QA finished their process and marked all of the JIRA issues closed. However, they don't have permissions to modify Mercurial to close the branches. That makes sense because they should be testing and not writing code. Now it is time to pay the piper.

We needed a mechanism to read the JIRA issues, look for the closed issues, assign them to a primary committer on JIRA with permissions on Mercurial, close the branch, and push to update the issue with a JIRA comment from the Mercurial check-in trigger. Got that?

Lets try that again...
  1. Read the JIRA issues and find all CLOSED issues.
  2. Read all of the Mercurial branches that are not closed. Remember the branches have the same name as the JIRA issue.
  3. Assign the JIRA issue to a primary committer.
  4. Switch to the branch and update
  5. Close branch and commit
  6. Push to "Master" server. This will not work unless the issue is assigned to primary committer since it has a commit trigger.
  7. The commit will update JIRA with the closed branch commit comments.

Are you still with me?

The code we wrote to do most of the work is proprietary. However, one aspect of it is worth sharing with the community. How do you assign a JIRA ticket to another user using the JIRA REST interface. The code below demonstrates how to do that.

Code

IssueAssignmentClient.java


App.java


Popular Posts