    /**
     * Converts a file into a byte[] array.
     * @param file file to be converted
     * @return file converted to {@code byte[]}
     * @throws java.io.IOException
     */
    public static byte[] getBytesFromFile(final File file) throws IOException {
        InputStream is = new FileInputStream(file);

        // Get the size of the file
        long length = file.length();

        if (length > Integer.MAX_VALUE) {
            /* File is too large. If we are trying to determine the length of the byte[]
             * array, it can only return an int, so we are limited by the file size.
             */
            throw new IOException(file.getName() + " is too large.");
        }

        // Create the byte array to hold the data
        byte[] data = new byte[(int) length];

        // Read in the bytes
        int offset = 0;
        int bytesRead = 0;
        while (offset < data.length &&
                (bytesRead = is.read(data, offset, data.length - offset)) >= 0) {
            offset += bytesRead;
        }

        // Ensure all the bytes have been read in
        if (offset < data.length) {
            throw new IOException("An exception occurred while trying to read + "
                    + file.getName() + " into the byte array.");
        }

        // Close the input stream and return bytes
        is.close();
        return data;
    }
}
Monday, May 04, 2009
How to Convert a File to a Byte Array
I wrote an EJB which performs faxing using gnu-hylafax for Java. The trick is that I needed to convert the file to bytes[] to pass to the EJB. Here is how I did it, but it should work for most files.
Friday, May 01, 2009
Mercurial on GlassFish 2.1 Using Multiple Repositories
Introduction
In this tutorial I explain the basics of creating multiple Mercurial repositories, and then configuring GlassFish 2.1 to connect and display them. Mercurial is an open source source control system. GlassFish is an open source Java™ application server. I will not explain how to install Mercurial, nor GlassFish. The respective sites have excellent documentation on how to install them.
Creating Repositories
1. Create a directory called /repos.
2. Using the command prompt, navigate to the /repos directory and issue the following commands.
3. Change to the respective repositories and add a file called hgrc to the .hg directory. This file should contain a contact and a description of the repository. Here is a representative example from my alpha repository.
NetBeans 6.5
1. Using NetBeans create a new Project -> Java Web ->Web Application.
2. Call the project Mercurial.
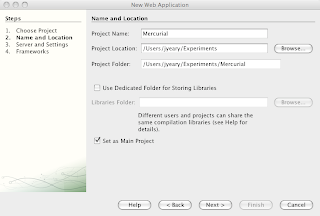
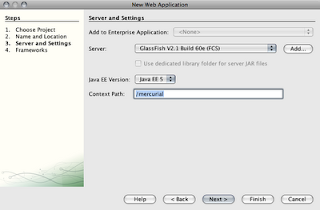
3. The default Context Path is the project name. We will change it from /Mercurial to /mercurial.
4. Click Finish. This will create a basic web project which will compile to a nice WAR file for deployment on GlassFish.
5. We will begin to modify our project by removing the index.jsp file.
6. Next go to the Web Pages -> WEB-INF directory. In here you will find the default web.xml file. Open it in the editor.
7. Follow the directions from Jean-Francois Arcand's Blog on Enabling CGI support in GlassFish. An example of my web.xml file is displayed below. This will enable the CGI servlet which is used by Mercurial to display the repositories.
8. Next we will create a sub-directory WEB-INF called cgi. This will contain our CGI applications.
9. Obtain a copy of the source code for your version of Mercurial. Locate the hgwebdir.cgi file and copy it to your WEB-INF/cgi directory.
10. Create a file called hgweb.config in the WEB-INF/cgi directory. The hgwebdir.cgi application expects this file to exist and point to your repositories. The hgwebdir.cgi file contains help on configuring the file. Here is an example configuration based on our setup.
[paths]
/ = /repos/*
This will allow the hgwebdir.cgi to map all repositories located in the /repos directory.
11. Next we modify the web.xml file and change the welcome files list to point to the application.

Issues
If you encounter any errors, or nothing appears, you can enable debugging for python by un-commenting the following lines in the hgwebdir.cgi file.
Here is a copy of my NetBeans Mercurial Project. It is itself a Mercurial repository.
In this tutorial I explain the basics of creating multiple Mercurial repositories, and then configuring GlassFish 2.1 to connect and display them. Mercurial is an open source source control system. GlassFish is an open source Java™ application server. I will not explain how to install Mercurial, nor GlassFish. The respective sites have excellent documentation on how to install them.
Creating Repositories
1. Create a directory called /repos.
2. Using the command prompt, navigate to the /repos directory and issue the following commands.
hg init alphaThis will create three new Mercurial repositories.
hg init beta
hg init omega
3. Change to the respective repositories and add a file called hgrc to the .hg directory. This file should contain a contact and a description of the repository. Here is a representative example from my alpha repository.
[web]This information will be displayed on our main page.
contact = John Yeary <jyearyATbluelotussoftwareDOTcom>
description = Alpha source code repository.
NetBeans 6.5
1. Using NetBeans create a new Project -> Java Web ->Web Application.
2. Call the project Mercurial.

3. The default Context Path is the project name. We will change it from /Mercurial to /mercurial.

4. Click Finish. This will create a basic web project which will compile to a nice WAR file for deployment on GlassFish.
5. We will begin to modify our project by removing the index.jsp file.
6. Next go to the Web Pages -> WEB-INF directory. In here you will find the default web.xml file. Open it in the editor.
7. Follow the directions from Jean-Francois Arcand's Blog on Enabling CGI support in GlassFish. An example of my web.xml file is displayed below. This will enable the CGI servlet which is used by Mercurial to display the repositories.
<?xml version="1.0" encoding="UTF-8"?>
<web-app version="2.5" xmlns="http://java.sun.com/xml/ns/javaee"
xmlns:xsi="http://www.w3.org/2001/XMLSchema-instance"
xsi:schemaLocation="http://java.sun.com/xml/ns/javaee http://java.sun.com/xml/ns/javaee/web-app_2_5.xsd">
<servlet>
<servlet-name>cgi</servlet-name>
<servlet-class>org.apache.catalina.servlets.CGIServlet</servlet-class>
<init-param>
<param-name>debug</param-name>
<param-value>0</param-value>
</init-param>
<init-param>
<param-name>cgiPathPrefix</param-name>
<param-value>WEB-INF/cgi</param-value>
</init-param>
<load-on-startup>5</load-on-startup>
</servlet>
<servlet-mapping>
<servlet-name>cgi</servlet-name>
<url-pattern>/cgi-bin/*</url-pattern>
</servlet-mapping>
<session-config>
<session-timeout>
30
</session-timeout>
</session-config>
<welcome-file-list>
<welcome-file>index.jsp</welcome-file>
</welcome-file-list>
</web-app>
8. Next we will create a sub-directory WEB-INF called cgi. This will contain our CGI applications.
9. Obtain a copy of the source code for your version of Mercurial. Locate the hgwebdir.cgi file and copy it to your WEB-INF/cgi directory.
10. Create a file called hgweb.config in the WEB-INF/cgi directory. The hgwebdir.cgi application expects this file to exist and point to your repositories. The hgwebdir.cgi file contains help on configuring the file. Here is an example configuration based on our setup.
[paths]
/ = /repos/*
This will allow the hgwebdir.cgi to map all repositories located in the /repos directory.
11. Next we modify the web.xml file and change the welcome files list to point to the application.
<welcome-file-list>
  <welcome-file>cgi-bin/hgwebdir.cgi</welcome-file>
</welcome-file-list>
12. Click on Run and you should be delighted to see the following.

Issues
If you encounter any errors, or nothing appears, you can enable debugging for python by un-commenting the following lines in the hgwebdir.cgi file.
# Uncomment to send python tracebacks to the browser if an error occurs:You may also enable debugging on the cgi application by changing the debug parameter to 1 in the web.xml file
#import cgitb
#cgitb.enable()
<init-param>
<param-name>debug</param-name>
<param-value>1</param-value>
</init-param>
Here is a copy of my NetBeans Mercurial Project. It is itself a Mercurial repository.
Subscribe to:
Posts
(
Atom
)
