I have been given a great opportunity to move our current source control system from ClearCase to Mercurial. This includes using Active Directory for authentication and authorization. There are a number of great blog posts which helped me along the way. Please see the References at the bottom of the blog. However, I found that none of them were complete, or used older versions of the software.
Prerequisites
Installation Process
Install Python
Download and install
Python 2.7.3 X86-64 using the installer.
Install Mercurial
Download and install
Mercurial 2.5.2 (X86-64) for use with Python 2.7.
Note: Do not install
TortoiseHg. It is not required, and these directions will not work.
Install Internet Information Server (IIS)
Using the Server Manager on Windows 2008 Server R2, you need to add a role to install IIS. It is not as intuitive as it should be. On other versions of Windows, you would add it as a service.
- Add a Server Role.

- Select IIS Role.

- Select Role Services.
- Application Development
- CGI
- ISAPI Extensions
- ISAPI Filters
- Security
- Basic Authentication
- Windows Authentication
- Request Filtering

- Installation Complete

Install and Configure CGI (hgweb.cgi)
- Clone the mercurial repository, and copy the hgweb.cgi application to located in the project root to C:\Python27\Lib\site-packages\mercurial\hgweb.
hg clone http://selenic.com/repo/hg
- Create a hgweb.config in C:\Python27\Lib\site-packages\mercurial\hgweb. Here is an example file:
[web]
encoding = UTF-8
allow_push = *
push_ssl = False
contact = John Yeary
allowzip = True

[paths]
test = C:\repos\test
- Modify the hgweb.cgi file to use the new configuration.
#!/usr/bin/env python
#
# An example hgweb CGI script, edit as necessary
# See also https://www.mercurial-scm.org/wiki/PublishingRepositories

# Path to repo or hgweb config to serve (see 'hg help hgweb')
config = "hgweb.config"


# Uncomment and adjust if Mercurial is not installed system-wide
# (consult "installed modules" path from 'hg debuginstall'):
#import sys; sys.path.insert(0, "/path/to/python/lib")

# Uncomment to send python tracebacks to the browser if an error occurs:
#import cgitb; cgitb.enable()

from mercurial import demandimport; demandimport.enable()
from mercurial.hgweb import hgweb, wsgicgi
application = hgweb(config)
wsgicgi.launch(application)
Setup IIS Python CGI Handler
- Add a Virtual Directory to the Default Web Site
- Alias: hg
- Physical Path: C:\Python27\Lib\site-packages\mercurial\hgweb

- Select Handler Mapping from the newly created hg virtual directory.
- Click Actions --> Add Script Map
- Set the following parameters:
- Request Path: *.cgi
- Executable: C:\Python27\python.exe -u "%s"
- Name: Python

- Restart IIS Server
Create Mercurial Test Repository
c:\>mkdir repos

c:\>cd repos

c:\repos>mkdir test

c:\repos>cd test

c:\repos\test>hg init

c:\repos\test>echo "THIS IS A TEST FILE" > README

c:\repos\test>hg add README

c:\repos\test>hg commit -u jyeary -m "Initial Import"

c:\repos\test>hg summary
parent: 0:d5c9f65c740a tip
 Initial Import
branch: default
commit: (clean)
update: (current)
Test Configuration
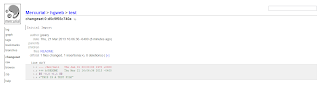
Using a browser, go to
http://localhost/hg/hgweb.cgi. You should see the following:

Here is the changeset for the initial import
URL Rewrite (OPTIONAL)
If you want a cleaner URL for users, you will want to "prettify" your URLs. Luckily, Microsoft has a
URL Rewrite plugin for IIS. You will want to install it from the link provided.
Here is the configuration for our application:
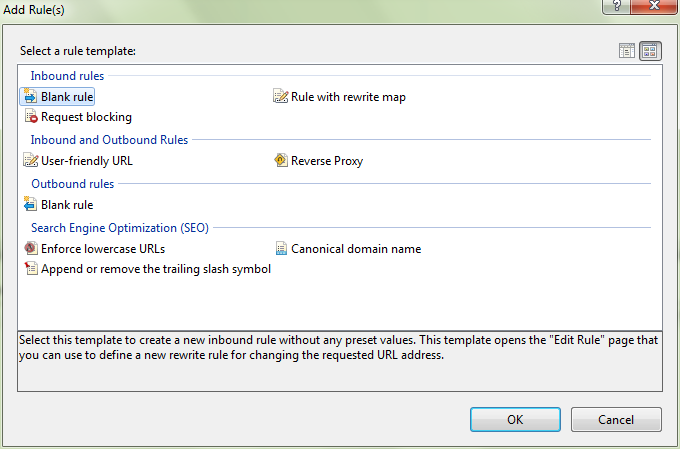
- Select URL Rewrite from the hg virtual directory.
- Create a new blank rule.
- Create a Rule with the following parameters:
- Name: hgweb.cgi
- Match URL:
- Using: Wildcards
- Pattern: *
- Conditions
- Add Condition
- Condition Input: {REQUEST_FILENAME}
- Check if input string: Is Not A File

- Action
- Action Type: Rewrite
- Rewrite URL: hgweb.cgi/{R:1}

- Apply Changes
- Modify the hgweb.config and add the baseurl attribute.
[web]
encoding = UTF-8
baseurl= /hg
allow_push = *
push_ssl = False
contact = John Yeary
allowzip = True

[paths]
test = C:\repos\test
The URL should be much easier now
http://localhost/hg/test/
Basic Authentication (Active Directory> for push (OPTIONAL)
The default setup from the
hgweb.config allows push from all clients. If we want to add more security, we need to specify authentication, and who is allowed to push.
Note: Basic Authentication passes username and password in clear text. You should use Basic Authentication in conjunction with SSL.
In the default configuration provided, you can push back any changes as shown below.
C:\Users\jyeary\Desktop>hg clone http://localhost/hg/test
destination directory: test
requesting all changes
adding changesets
adding manifests
adding file changes
added 1 changesets with 1 changes to 1 files
updating to branch default
1 files updated, 0 files merged, 0 files removed, 0 files unresolved

C:\Users\jyeary\Desktop>cd test

C:\Users\jyeary\Desktop\test>ls
README

C:\Users\jyeary\Desktop\test>touch FILE1

C:\Users\jyeary\Desktop\test>touch FILE2

C:\Users\jyeary\Desktop\test>hg add FILE1

C:\Users\jyeary\Desktop\test>hg add FILE2

C:\Users\jyeary\Desktop\test>hg commit -u jyeary -m "Added files."

C:\Users\jyeary\Desktop\test>hg push
pushing to http://localhost/hg/test
searching for changes
remote: adding changesets
remote: adding manifests
remote: adding file changes
remote: added 1 changesets with 2 changes to 2 files
We will configure our application and the server to use authentication.
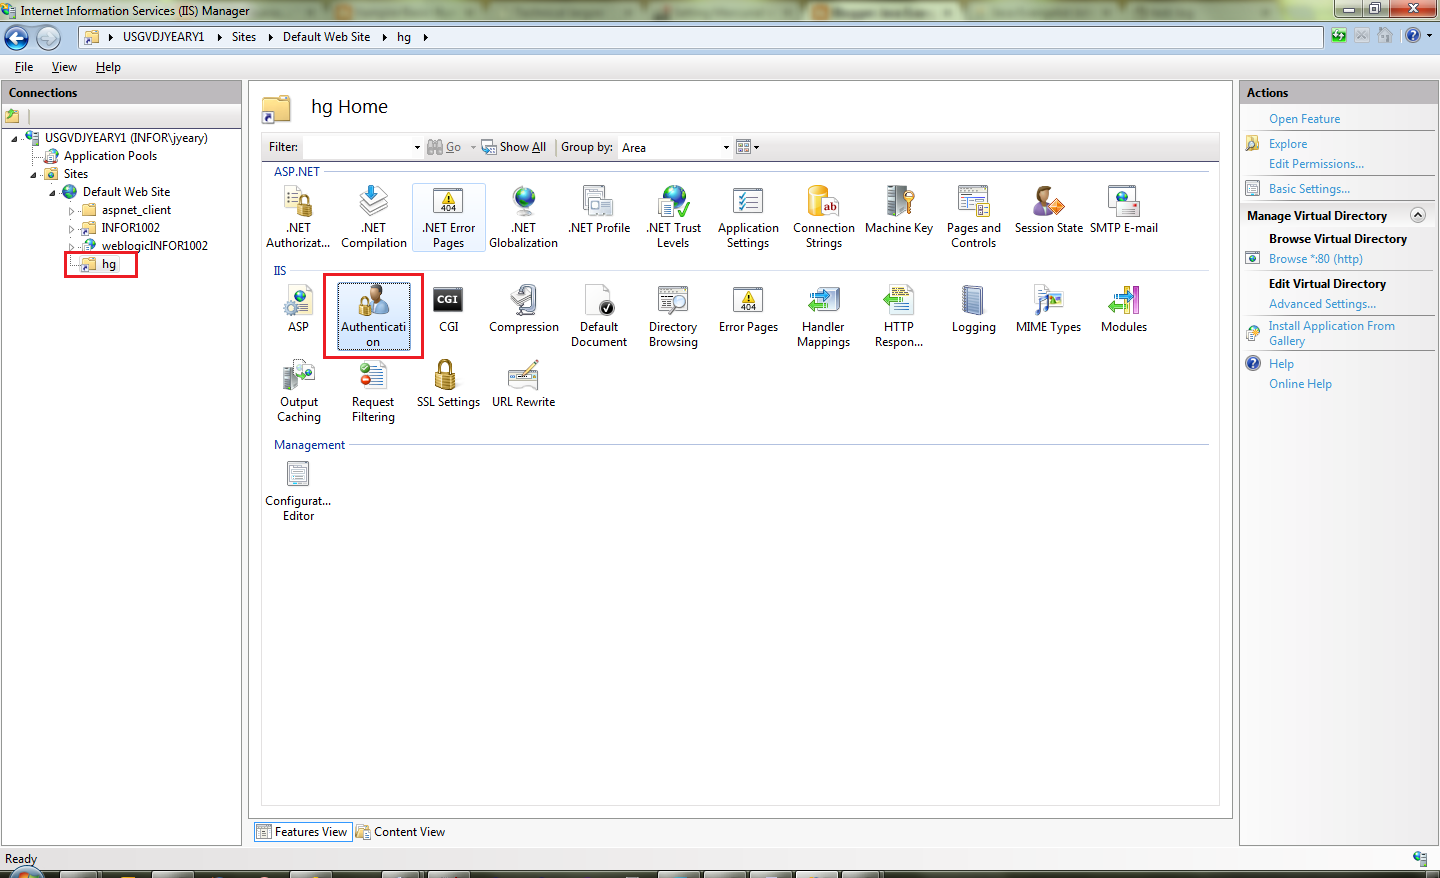
- Select the hg virtual directory.
- Select Authentication

- Select Basic Authentication and Enable it.

- Edit the settings for your Active Directory (AD) domain.
- Domain: THIS IS YOUR AD DOMAIN
- Realm: You can call this anything that you like, I personally use the domain name.

- You have set up the authentication, but it still will allow you to push files as demonstrated below.
C:\Users\jyeary\Desktop\test>touch FILE3

C:\Users\jyeary\Desktop\test>hg add FILE3

C:\Users\jyeary\Desktop\test>hg commit -u jyeary -m "Added FILE3"

C:\Users\jyeary\Desktop\test>hg push
pushing to http://localhost/hg/test
searching for changes
remote: adding changesets
remote: adding manifests
remote: adding file changes
remote: added 1 changesets with 1 changes to 1 files
- To enable push to require authentication, we need to modify the hgweb.config file. We will modify
allow_push = *, and set it to allow push from only certain individuals.
[web]
encoding = UTF-8
baseurl= /hg
allow_push = jyeary
push_ssl = False
contact = John Yeary
allowzip = True

[paths]
test = C:\repos\test
Since we have set push to accept only jyeary, it will ask us to authenticate and shown below.
C:\Users\jyeary\Desktop\test>touch FILE4

C:\Users\jyeary\Desktop\test>hg add FILE4

C:\Users\jyeary\Desktop\test>hg commit -u jyeary -m "Added FILE4"

C:\Users\jyeary\Desktop\test>hg push
pushing to http://localhost/hg/test
searching for changes
http authorization required
realm: mydomain.com
user: jyeary
password:
remote: adding changesets
remote: adding manifests
remote: adding file changes
remote: added 1 changesets with 1 changes to 1 files
Enable SSL (OPTIONAL)
I am indicating that this is optional, but if you are using Basic Authentication; it really should be required. This shows how to create a simple self-signed certificate. In a production environment, you will want to have a certificate signed by Certification Authoritity (CA).
- Select the server, and select Server Certificates.

- Create a self-signed certificate.


- Right-click on the Default Web Site, and select Edit Bindings.
- Select Add a Binding
- Add an SSL binding as follows:
- Type: https
- Port: 443
- SSL Certificate: selfSigned
- Modify the hgweb.config file, and remove the
push_ssl = False line.
- Test the new configuration by cloning the secured repository
Note: Unless you add the certificate fingerprint to your hgrc, you will need to use the --insecure flag with mercurial.
C:\Users\jyeary\Desktop>hg clone --insecure https://localhost/hg/test
warning: localhost certificate with fingerprint e5:32:64:97:6e:10:43:e5:c7:71:92:9f:08:20:e9:4d:54:d6:c3:04 not verified (check hostfingerprints or web.cacerts config setting)

destination directory: test
requesting all changes
adding changesets
adding manifests
adding file changes
added 4 changesets with 5 changes to 5 files
warning: localhost certificate with fingerprint e5:32:64:97:6e:10:43:e5:c7:71:92:9f:08:20:e9:4d:54:d6:c3:04 not verified (check hostfingerprints or web.cacerts config setting)

updating to branch default
5 files updated, 0 files merged, 0 files removed, 0 files unresolved
Conclusion
Setting up Mercurial is easy to do in a Windows environment. You will gain all of the great benefits from Mercurial along with active directory. It is much easier to setup Mercurial on IIS for use with Active Directory than on a LAMP stack with winbind, or LDAP. If AD is a requirement... this is definitely the solution.
References